Setting Up Your New Machine - a Simple Dev Environment Configuration Guide
As developers, we interact with all kinds of machines every day. A well-configured development environment can significantly boost productivity and make coding more enjoyable. This comprehensive guide will help you set up a comfortable and efficient workspace. It's mainly for beginners, but experienced developers may also find some useful tips.
Why Development Environment Configuration Matters & Who This Guide Is For
When I started coding, my terminal was a stark black and white window that failed to inspire creativity. Now, my terminal is colorful, feature-rich, and a joy to use. This transformation is just one example of how proper configuration can enhance your coding experience.
Terminal configuration is just one part of the larger concept of development environment configuration. These configurations can be complex, but this guide tries to provide a road map for beginners. This guide will not be a step-by-step tutorial, meaning I will not show you how to download and install the individual applications. You can refer to the official websites to learn how to install and use these applications in detail.
This post is inspired by:
Network Configuration: The First Step
Before diving into development environment setup, ensure your network is functioning correctly. You'll need a stable internet connection to download various tools and packages.
Client-Side Configuration: Windows, macOS, and Linux
When I say "client side", I mean the local machine you are using, i.e. your PC or Mac.
On a Mac, you must use macOS, while on a PC, you can use Windows or Linux. Most configurations on a Unix-like operating system (like macOS or Linux) are similar, while they may vary on Windows. As developers, we use Unix-like systems (most of which are Linux) much more than Windows. However, as a beginner in the IT field (e.g. a Chinese CS student), you may only have a PC running Windows.
In this guide, I will respect that by trying to make your Windows a little more "Unix-like". We will not use virtual machines (e.g. VMWare or WSL), as this method installs a full Linux.
Adding a User Account
This section is basically for Linux users only. When you install a new Linux system, you may only have a root account. It is not recommended to use the root account for daily work, as it is too powerful and can cause serious problems if you make a mistake. It's recommended that you create a new user account and use it instead.
You can create a new account with the following command (replace username with your desired username)
1 | useradd -m username |
The useradd command is a POSIX-compliant command that creates a new user account. The -m flag creates a home directory for the new user. After running this command, you can use the passwd command to set a password for the new user. You may also want to make the new user a sudoer, which can be done by adding the user to the sudo group:
1 | usermod -a -G sudo username |
Or you can edit the sudoers file manually by running visudo.
If you are using Ubuntu, you can use the adduser command instead. Follow the instructions it gives and enjoy a more user friendly experience:
1 | adduser username sudo |
Choosing the Right Font
A good programming font can make a world of difference. Look for fonts with features like:
- Mono spacing
- Easily distinguishable characters (so that you can easily tell the difference between
landI,Oand0, etc.) - Ligature support
Moreover, a font collection called "Nerd Fonts" provides many patched fonts with icons, which are very useful in the terminal.
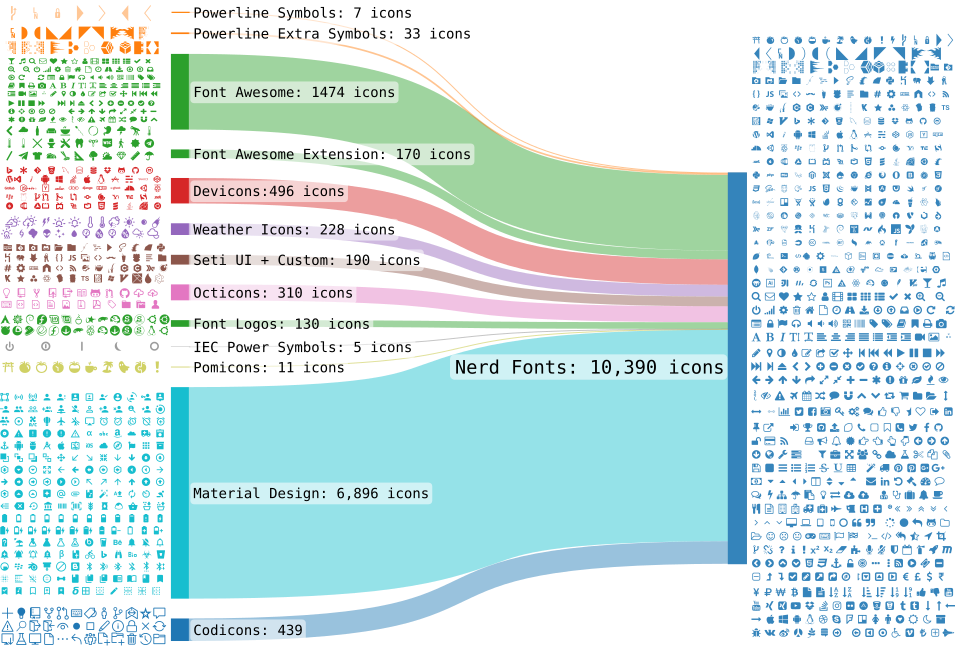
The FiraCode Nerd Font is my favorite. Give it a try!
Terminal, Console & Terminal Emulator: Beyond the Basics
You may have heard the term "terminal" or "console" before. These pronouns are from the old days when computers were huge and expensive. There might be one computer in an entire building. Terminals would be placed in different rooms in the building so that people could interact with that computer. The terminal is a text-based interface, and the console is a physical device.
The terminal emulator is software that emulates the terminal, basically it's a GUI application that looks like a terminal. These days, you can use these terms interchangeably.
No matter what operating system you are using, you have a built-in terminal, e.g. Terminal.app on Mac and Windows Terminal on Windows. However, third-party options offer more features and customization. Consider:
Alacritty is a cross-platform, high-performance and highly customizable terminal emulator. You can also use Alacritty on Mac, but I prefer iTerm2 on Mac.
Here is my Alacritty configuration file on Windows:
1 | working_directory = "D:\\Documents" |
A theme is a set of configurations that change the appearance of the applications. You can use a theme to make your terminal utilities nicer and easier to use. For example, set the colorschema in Vim. However, I prefer to set the theme in the terminal emulator so that all the terminal utilities share a similar look. I use the Dracula theme in Alacritty and iTerm2.
By the way, the Dracula theme is also available in many other applications. I also use it in my VS Code and JetBrains IDEs. A shared theme makes your development environment more consistent and beautiful.
Shell: The Bridge Between You and the System Kernel
The program running in the terminal is called a shell. It is a bridge between the user and the system kernel. On most Linux, the default shell is bash, while on macOS, it is zsh. There are two shells on Windows, cmd and PowerShell.
I recommend using zsh on all systems. You can view it as a super set of bash with more features. Here is my configuration, in which I:
- Use the
oh-my-zshframework to makezshconfiguration easier - Use the theme
powerlevel10kto customize the command prompt - Use a lot of other plugins and configurations
If you don't want to use zsh since it needs some configurations, a good alternative is fish. However, fish is not POSIX-compliant, which means you may have some compatibility issues with some shell scripts. This is the reason why I prefer zsh. But it's fine for beginners.
You have bash installed on most unix-like systems and it's easy to install zsh or fish on those platform. But on Windows, it is a little bit tricky.
If you want to install bash on Windows, you may use git bash. It will be installed when you install git, a popular version control system, on Windows. Furthermore, you can also use zsh on Windows. The articles below may be helpful:
I haven't yet found a good way to install fish on Windows. If you know how to do that, please let me know by leaving a comment or sending me an email.
Another thing you may need to attention is the character set used on your Windows platform. If you are a Chinese CS student using Chinese Windows, the default character set of your system is usually not UTF-8. So you may encounter a mojibake issue. You can add the lines to the very head of your ~/.zshrc which enables UTF-8 in your terminal to fix this issue:
1 | # Set Windows code page to 65001 (UTF-8). |
After installing the shell you like, you can make it the default shell by running the following command (Unix-like systems only):
1 | chsh -s $(which zsh) |
Package Managers: The App Store for Developers
A package manager basically plays the role of an app store. The term "package" means a bunch of files. An executable application is basically a bunch of files, so you can think of an application as a package.
With the help of package managers, you no longer have to go to the official website of a particular application, click on download and then install it, but with one line of simple commands.
On different versions of Linux there are different package managers, for example, the most popular package manager on Ubuntu is apt, and on Arch it is pacman. They are installed when the Linux systems are ready.
On the Mac, however, you need to download and install a package manager. The most popular one is Homebrew. Windows does not have a package manager either. You can download and install scoop or choco yourself.
The concept of "package manager" explained above is really dirty and loose. To be more precise, the above package managers are system-wide. There are many more package managers in various tech stacks. For example, npm in node.js projects and cargo in rust projects, etc.
For Chinese users, a common headache is the physical distance from the server, which leads to problems such as poor network signal and consequently slow download speeds, or even timeouts, and ultimately the inability to download packages properly using a package manager. In this case, you can use a mirror site. In the past, we had to manually modify a bunch of configuration files for different package managers. But now you can use a tool called chsrc.
Gsudo: A Third Party sudo for Windows
This section is for Windows users only. sudo is a command in Unix-like systems that allows you to run a command as the superuser. Windows does not have a sudo command, but you can use gsudo as an alternative.
A common use case is when you want to use choco to install a package, you run a command like choco install xxx, but you may get an error because you don't have permission to install the package. In this case, you can use gsudo !! to run the command as an administrator. (The !! is a shortcut in zsh that means the last command.)
TLDR: A Quick & Dirty Manual
On Unix-like systems, you can use the man command to see the manual for a command. However, the manual is usually too long and hard to understand. I just want to know the basic usage of the command, but man gives much more information than I need.
The tldr-pages project fills this need. Running tldr xxx will give you examples of how to use the xxx command, covering the most common use cases.
I recommend using the tealdeer client, which is based on the tldr pages projects, but written in Rust. It is much faster than the original tldr client.

Vim & VS Code: The Two Editors
I use Vim & VS Code every day. I use Vim for quick and small edits and VS Code for large projects. Even in VS Code, I'm using the Vim extension to enable the Vim key bindings.
My Vim configuration is here.
To make Vim the default editor on Ubuntu, you can run the following command as root:
1 | update-alternatives --config editor # and select vim in the menu |
Version Control of the Environment
Here I'm not talking about version control systems like git, but the version of the software you are using. For example, you may have Node 20 installed on your machine, but your project requires Node 14. How to switch among different versions of the same software quickly and efficiently? These tools can help:
- Java:
sdkman, etc. - Node.js:
fnm,n,nvm, etc. - Python:
pyenv,conda, etc. (I also wrote a blog post about this).
Dotfiles: Persisting your App Configurations
Many programs on Unix-like systems use files with names beginning with . as their configuration files. For example, .bashrc for bash and .vimrc for vim. So you can save these files somewhere (like a GitHub repo) and sync them to your new machine. If you search for dotfile on GitHub, you will find many repositories with a similar name. See dotfiles.github.io for more information.
My dotfiles are here.
Server Side Configuration: Linux Is Your Best Friend
On servers, Linux is the most popular operating system. So, in general, all you need to do is copy your Linux-based client-side configurations to the server side.
SSH: Connecting to the Server with Ease
SSH (Secure SHell) is a network protocol that allows you to connect to a remote server securely. It is widely used in the IT industry. You can use the ssh command on your local machine to connect to a server. For example:
1 | ssh username@hostname |
By default, you must enter the password each time you connect to the server. You can omit this annoying step by using SSH keys. To do this: use the ssh-keygen command to generate a pair of keys on your local machine, and use the ssh-copy-id command to copy the public key to the server. You will be prompted to enter the password for the last time. You can then connect to the server without entering the password.
Note: I put the section about SSH in the server-side configuration, but the commands we use here are supposed to be run on the client side.